

Wet Wrapping to Help Eczema in 7 Easy Steps
Posted by Kelly Northey on 27th Jan 2021
Wet wrapping is one of the most popular,
tried-and-tested, and well used techniques for helping bring relief and healing
to children who deal with eczema. Even though this technique is so effective,
many parents shy away from it because it can often seem to be very complicated
and involved.
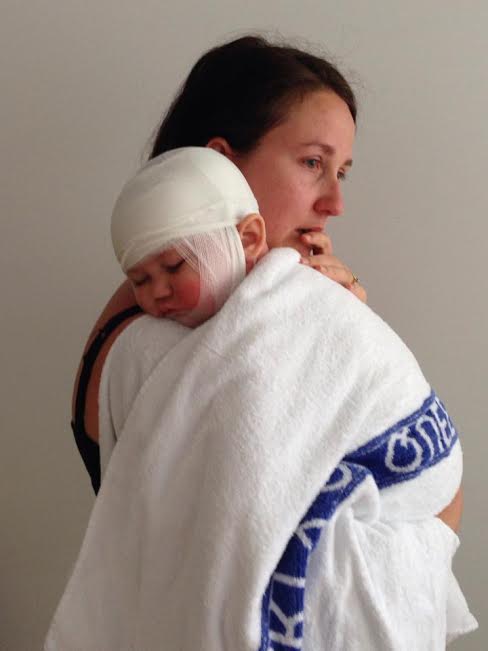
One of our customers Katie who's little boy Vann suffered severe eczema has kindly shared some photos of Vann in his wet wraps and also contributed some of the tips for this article.
Katie has a wonderful Facebook page called Ban Eczema for Vann where she has raised a lot of awareness around allergies and eczema, please head over there and check it out too.
While there are a few steps to getting a good wet wrap, the truth
is that after a few tries you’ll get it mastered and it will become one of the
easiest things you can do to help your child.
If you’re new to wet wrapping for
eczema, or if you want to help make your current technique a bit less
stressful, this article is for you!
How Wet Wrapping Helps
There are many reasons why wet wrapping is so effective in helping to relieve the itch and burn of eczema flare ups while also helping to heal and protect the skin, but a few of the benefits really stand out to parents who try this method.
First, wet wrapping can provide nearly instant relief from the most intense itching and irritation. The water contained in a wet wrap helps draw heat out of the skin to bring a cooling sensation that lasts a long time. This cooling also helps the body fight off the inflammation that often underlies itching and irritation. In the same way ice helps remove inflammation from sore muscles, the cool evaporative cooling of a wet wrap helps draw heat and inflammation out of the skin.
Next, when wet wrapping is done with a topical cream, ointment, or emollient, the wrap helps keep the product against the skin where it’s needed most. In normal circumstances, the skin only gets to absorb and use a small amount of product before the rest gets absorbed by clothing or wiped off during activity. Wet wraps lock the healing products in place against the skin so that they can be absorbed more deeply and more consistently over the course of several hours. Many parents find ointments perform dramatically better when used as a layer in wet wrapping.
Finally, the wet wrap itself acts as an extra protective barrier to help skin stay safe, clean, and nourished so that healing can take place. The wet wrap places the skin in such an ideal situation that healing can often happen faster while the skin is receiving extra protection from whatever life may bring – including fingers that want to scratch and pick at the flare up!
What You’ll Need
Here are the simple items you’ll want to have on hand and ready to use for wet wrapping:
- Bath oil
- Drawn luke-warm bath
- Cotton or bamboo towels
- Large bowl filled with warm water
- Tubifast, sports wraps, other tubular bandages or an easy option is any of our Bamboo Bubby garments (wash before using)
- Topical creams or prescription ointments.Great options are the Propolis Balm or Manuka Oil Balm (for those with pollen allergies) created by DermaGen.
- Emollient or Zinc Oxide Cream
 |
|

Here’s How To Wet Wrap The Easy Way!
With all of your supplies ready to go, this
process can go by quickly and easily with a bit of practice.
It's important though to try to stay calm yourself and try to make this process as relaxing as you can for your child, so it doesn't become a traumatic experience.
- Begin with a luke-warm bath using bath oil. Let your child soak for 15-20 minutes. Instead of drying like usual, gently pat the skin dry with a soft cotton or bamboo towel.
- Soak your wraps/garments in the bowl. Ensure that they become thoroughly soaked with the warm water.
- Apply cream or ointment to the flare up area(s). Use gentle, calm movements as you apply the creams, their skin is already hot so fast vagarious movements can inflame the skin more.
- Over the top of the ointment, apply a thick layer of emollient or zinc oxide cream. Follow the grain of the hair while being careful not to wipe away the ointment too much. You cannot add too much of this, so be liberal!
- Remove your wraps from the water and let some of the excess water drip back into the bowl.
- Gently wrap or roll the wraps
over the area of focus. If you’re using Tubifast garments, you can put them on
just like clothing while being careful not to accidentally wipe away the
ointments and emollient. If you’re using sports bandages or other wraps, wrap a
smooth layer without being too tight. Your goal is to create a ‘second skin’
using the wraps.
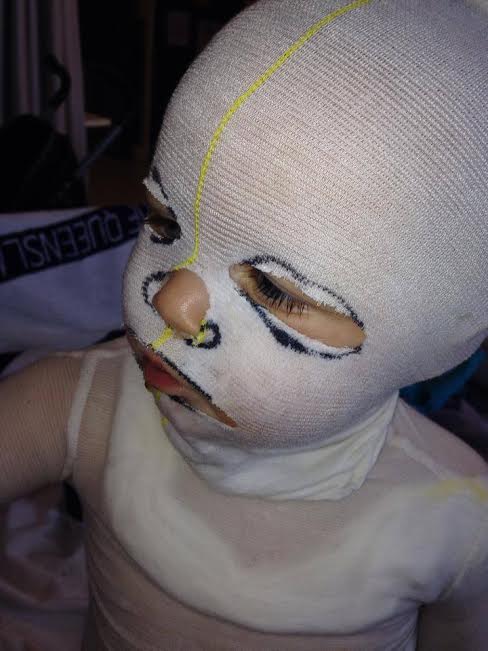
If your child's eczema is on their face, a great tip from Vann's mum Katie is to use yellow tubifast and make it into a mask. Making the mask is easier if you draw on it first and then with practice it becomes easier to make one without needing to draw on it first.
You can also use wet bandages with emollient underneath then dry tubifast on top like Katie has done in the photo below to help Vann's ankles.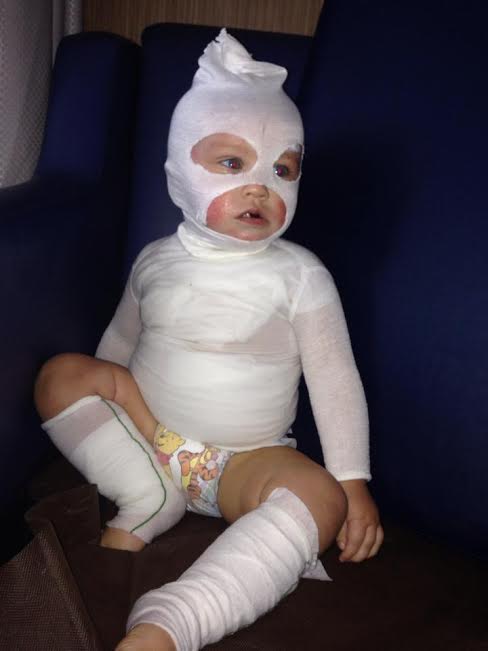
- Once your wraps are in place,
you can put on clothing as usual. Soft, dense cotton or bamboo fabrics are a
great choice to help the wraps last longer, and they make a great clothing
option for kids who will be sleeping in their wraps.
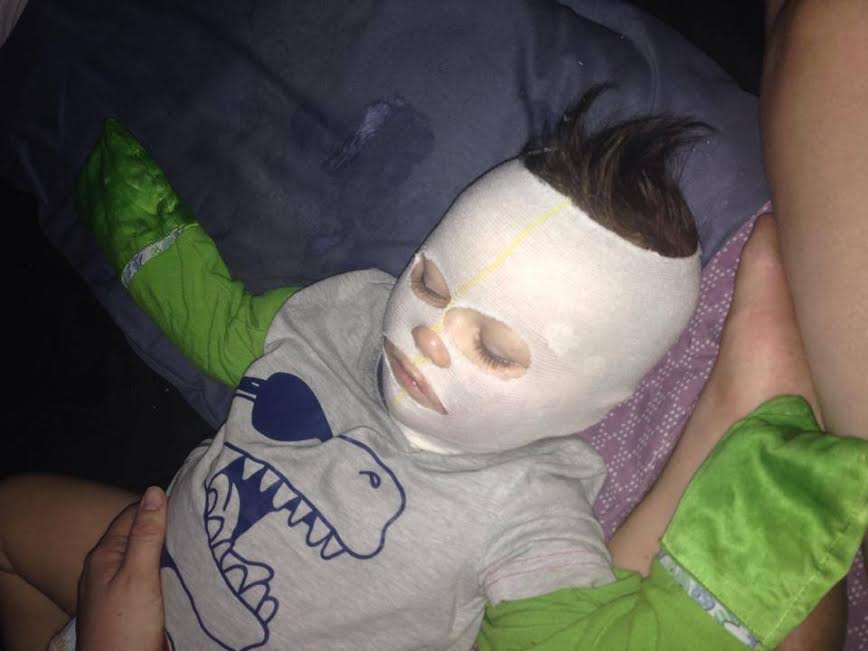
Vann in his perfected face mask and wearing his pair of Eczema Mitten Sleeves.
Wet wraps can be left on during the day for several hours, or overnight.

You can see the relief on Vann's face after wet wrapping in this photo.
Wet wrapping is soothing once on their skin once it has been applied.